Your shopping cart is empty!
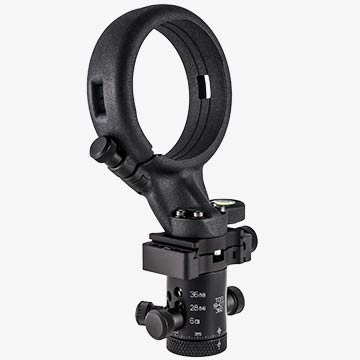
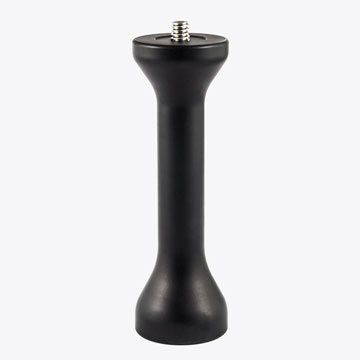
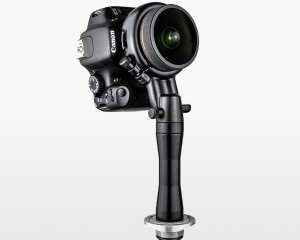
Ultralight Panohead for Samyang 7.5mm MFT (+4°)
")
")
")
")
")
")
")
Brand: TOM SHOT 360
Product Code: SAM-75M+4
Availability: In Stock (delivery in 2 to 6 days)*
*Delivery time estimate is for shipments within Germany. For other countries the delivery time will be different.
*Delivery time estimate is for shipments within Germany. For other countries the delivery time will be different.
Qty:
Features:
- This model is compatible with the Samyang 7.5mm MFT Fisheye Lens
- This model has a +4 degree tilt upward
- NEW modular design! Possible to change ring & add optional accessories
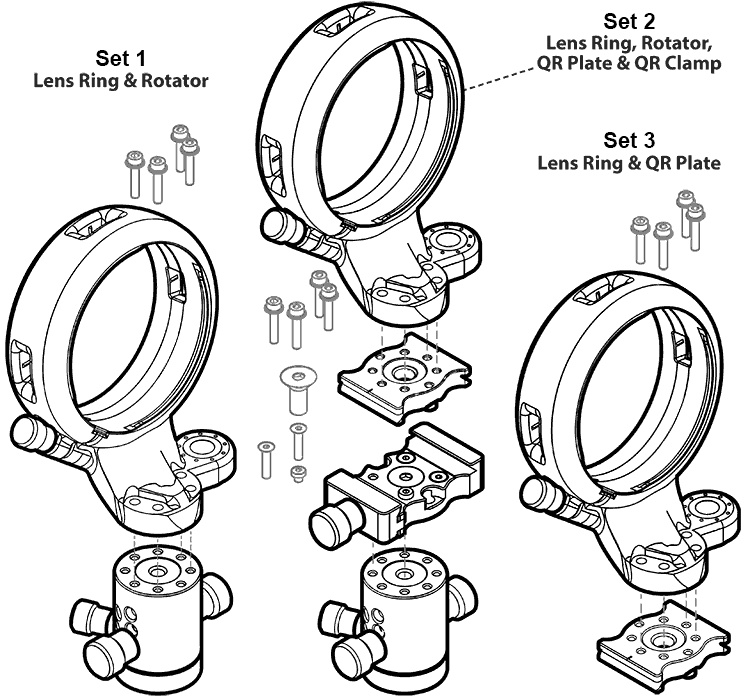
- This product is Set 1, includes one lens ring & one rotator
- Lightweight & compact (145 to 160mm height, 196 to 216g)
- 12 different click stops: 3, 4, 5, 6, 7, 8, 10, 12, 14, 16, 24, 32
- (Please note that the product images show an older design with different numbers of clicks compared to the current design. The images are for illustration purposes only. 18, 20, 28, 36 clicks shown in the images are not available on the most current design. The current number of clicks are selected for the most useful combinations while fitting within a compact size.)
- Viewport for visible aperture and focus settings
- Some lenses allow adjustments to aperture & focus, please check the specifications for which lenses are possible
- Shoot single row in 3 to 8 photos, the number depends on lens & camera sensor size
- Capture the sphere including full zenith, with a minimal sized nadir hole
- 3/8"-16 tripod thread under the rotator, with a 1/4"-20 adapter included
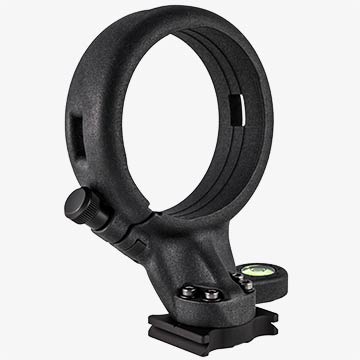
- Dettachabe ring has a 1/4" threaded insert, & can be used stand-alone with monopod
- Ring is 3D printed with strong polyamide nylon
- Rotator shell is made from 6082-T6 aluminum & 303 stainless steel internal click cylinder
- Large circular bubble level with extra high sensitivity
- Lenses, cameras, and software are not included
- Optional modular accessories are not included (e.g. quick release clamp, plate & rails)
- Made in Germany
Summary
This version is for use with the Samyang 7.5mm MFT Fisheye Lens, which also goes by the brands of Rokinon, Walimex Pro, and Bower. The lens has a mount for Micro 4/3 cameras, however you can also adapt it for use with Sony E-mount APS-C sensors if you use a mount adapter (not included) and you shave the lens hood. A panorama can be completed with a Micro 4/3 camera in 6 shots around and 1 hand nadir shot (zenith optional), but I recommend 8 shots around. With an APS-C camera in 4 shots and 1 optional hand nadir.
The focus and aperture rings are adjustable when the lens is installed in the panohead. Lens hood shaving is done by you at your own risk.
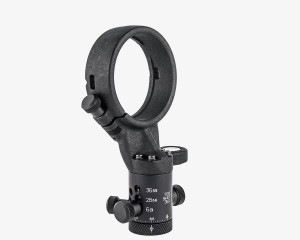
The Tom Shot 360 Ultralight Panohead is compact, lightweight, and easy to use for shooting 360° x 180° spherical panorama photos. Originally designed for extended hiking and bicycle trips, the new modular design with click stops is adaptable for use in multiple scenarios, and makes it possible to change the lens ring for mounting different fisheye lenses, and mix different combinations of optional accessories for standard, quick release, or stand-alone use.
The lens ring has fixed positions for the lens for horizontal rotation around the no-parallax-point, at the horizon for the minimum number of shots to complete a panorama. The ring is available in different versions. Each ring version is designed to fit only one specific model of fisheye lens, and cannot be used for other models of fisheye lenses. Before adding the product to the shopping cart, please check that the selected ring is compatible with your lens.
This product, Set 1, includes the lens ring and rotator. Other accessories such as the quick release clamp and plate are optional and not included. The modular accessories are not compatible with the older Classic uni-body versions from before 2018.
Modular System
This system makes it possible to mix different combination of parts.
We recommend buying a Set 1 with a complete pair of ring and rotator instead of purchasing the ring separately, and then adding optional accessories to Set 1. This is because the bubble level is glued centered onto the ring while attached to a specific rotator. Rotators and clamps have up to 0.1mm of level difference from one side of the top surface to the opposite side, and the bubble level is extremely sensitive. Attaching a ring to a different rotator than the one that it was originally assembled on, or to a clamp, could cause the bubble to be appear off-centered near the edge of the black centering circle. It is still usable, but you will need to take notice of the small off-centering of the bubble.

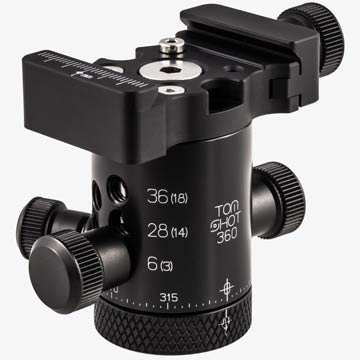
Set 1: Standard - with lens ring and rotator. This is the minimal setup for most shooting scenarios with a single lens and camera combination.
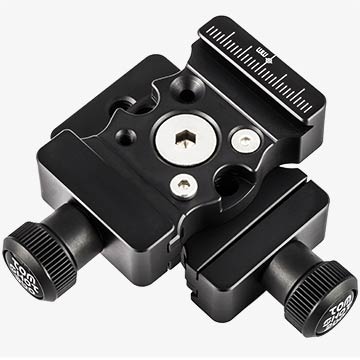
Set 2: Quick Release (optional, not included) - with lens ring, rotator, QR plate, and QR clamp. Useful for quickly changing your setup when shooting with different lenses.
Set 3: Lens ring and QR plate (optional, not included) - Can be used without other attachments such as on a monopod, with a lens and camera combination requiring 3 to 4 shots. Or attach the ring to your own equipment.
Set 4: Rotator and QR clamp (optional, not included) - 12 different click stops 3, 4, 5, 6, 7, 8, 10, 12, 14, 16, 24, 32. Can be combine with your own equipment.
Set 5: Double Clamp (optional, not included) - 2x single clamps can be combined together in parallel or at 90° to each other. The single clamps are identical to each other, so you will need to purchase 2 single clamps to make a double clamp.
Components and Optional Accessories
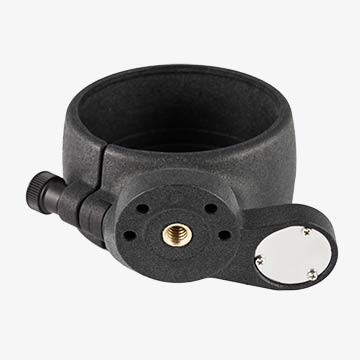
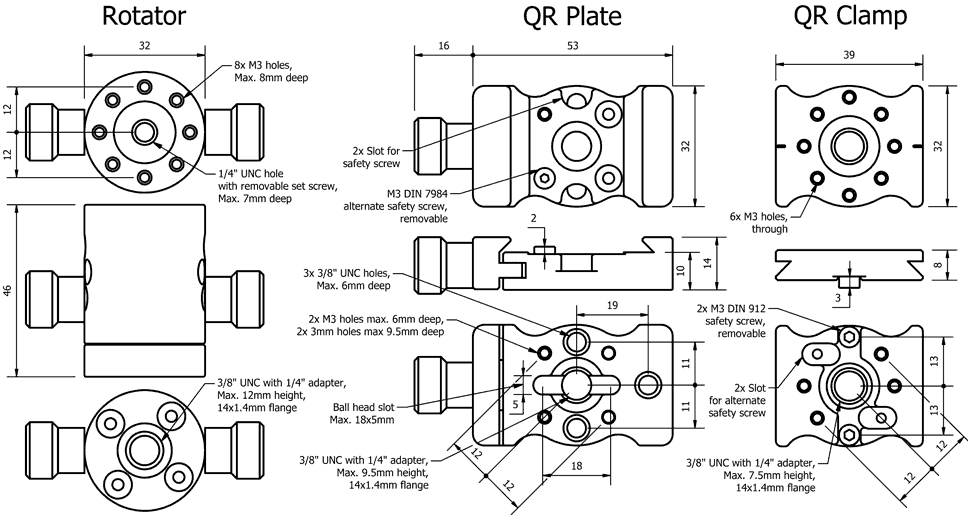
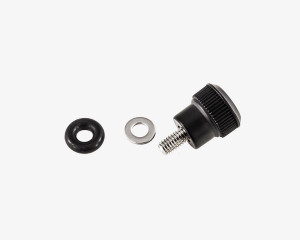
Lens Ring: A 1/4-20" brass threaded insert on the bottom of the ring (max 12.5mm depth) allows direct attachment by itself without other accessories. Use light force when threading into the insert. Do not overtighten. 32mm base diameter, with sloping front edge to minimize nadir footprint. 70g to 90g. 3D printed polyamide nylon material with SLS high resolution printer. Rings are designed to fit only one specific model of fisheye lens. Do not attempt to install different lenses.
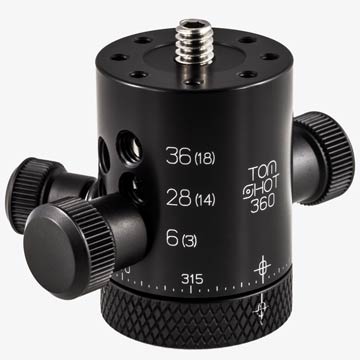
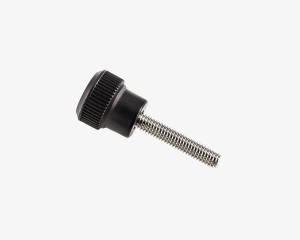
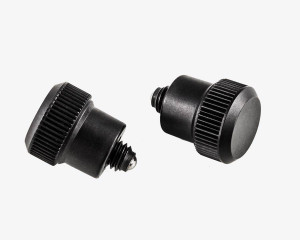
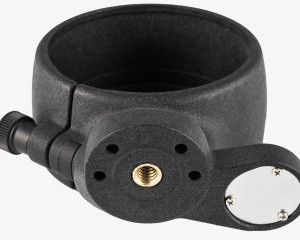
Rotator: It has a removable 1/4-20 x 1/2"screw on the top surface which can be used to attach your own equipment, which must be removed before attaching lens ring. There are also 8x M3 holes on top, spaced 45° apart and at 12mm radius from the center (max 8mm depth). The rotator also has a locking screw. The bottom has a 3/8"-16 center thread with a 1/4"-20 thread adapter. 32mm diameter x 46mm H, 126g, Aluminum body with stainless steel click cylinder.
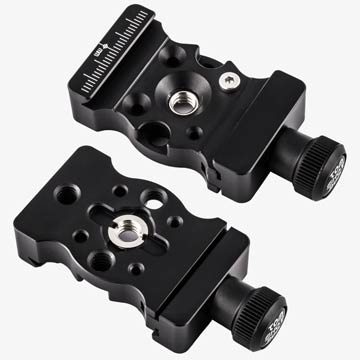
Clamp (optional, not included): Arca style quick release for standard 39mm wide plates & rails. For best fit and centering, it is recommended to use Tom Shot 360 plates. The bottom of a single clamp has a standard sized ball head mounting slot 5 x 18mm, and 3/8” center thread with a 1/4” thread adapter. 3 other 1/4” threaded holes on the bottom allow for alternative mounting. The front and back sides have a curved edge to minimize nadir footprint. 32 W x 53 L (+16 knob) x 14mm H (10mm inner height), 65g, Aluminum.
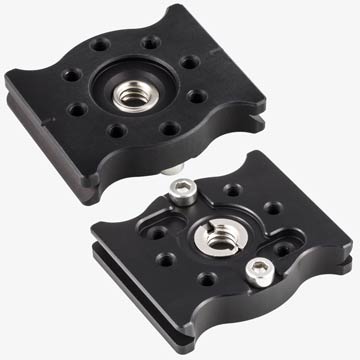
Plate (optional, not included): Arca style quick release plate, 39 W x 32 L x 8mm H. Designed for mounting Tom Shot 360 lens rings. There are 2 separate safety systems: M3 screws on the bottom, front and back of the plate that fit in the safety slots of standard clamps, and an alternative M3 screw located on Tom Shot 360 clamps so that the bottom of the plate can be made flat when removing the M3 screws on the plate. This makes it possible for the plate to sit flush on a flat surface, like on a monopod. Use at least 1 of the systems. The plate can also be used for custom configurations by the 3/8” center thread and the 1/4” thread adapter, and 8x M3 through holes spaced 45° apart. The 6 holes on the left & right sides are 12mm radius from the center, while the 2 holes on front and back are 13mm from center. The front and back sides have a curved edge to minimize nadir footprint. 25g, Aluminum.
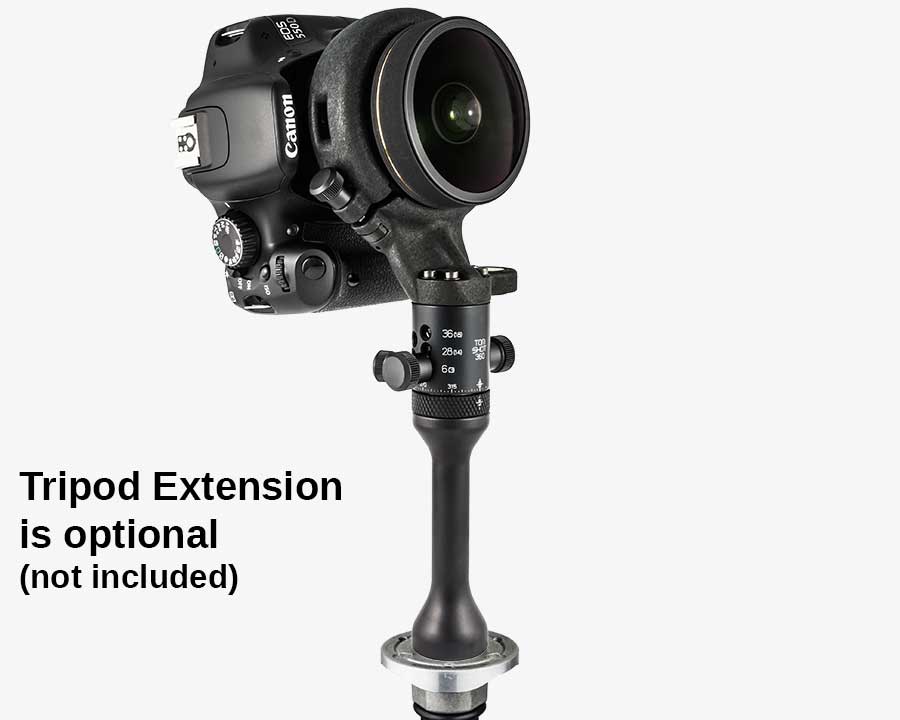
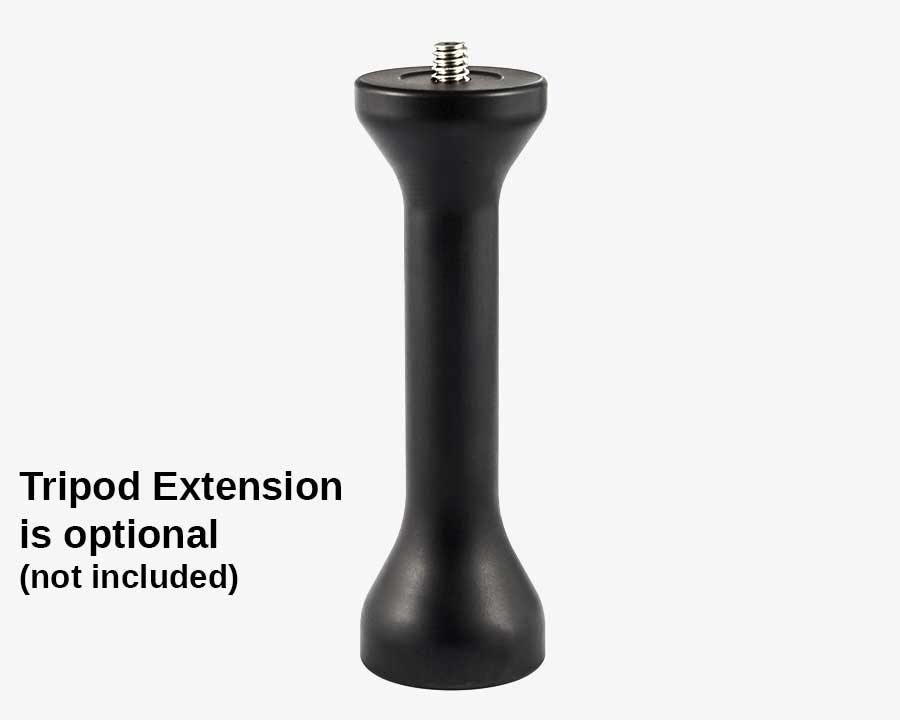
Tripod Extension (optional, not included): If your tripod column has a large diameter, or if you need to use a ball head which has knobs and plates protruding out of the nadir hole, then the optional Tripod Extension can be used to raise the lens by another 100mm, to make the objects that are directly below the panohead appear smaller and partially hide them inside the nadir hole. Please see the details in section below about nadir holes.
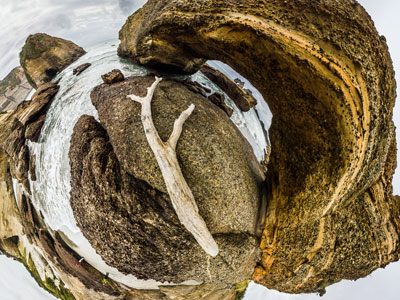
Samples (Samyang 7.5mm MFT with Sony APS-C)
Clicking on the images below will open a new window in your browser.

Demo Video
The YouTube video demonstrates the installation and operation of the Classic panohead for the Sigma 8mm f3.5 lens. However, the installation of the lens is similar to the newer modular design. An updated video for the new modular system will be forthcoming in the near future.
As shown in the video, lenses that have a protruding MF/AF switch (such as Sigma 8mm f3.5 for EOS) need to be matched to a slot on the lens ring for installation. One of the methods in the video for setting the focus is to use a piece of tape, however I do not recommend using tape because it will change the diameter and fit of the ring around the lens. But if you must use tape then make sure to use a narrow, short, and thin strip of tape not wider than 15-20mm, and not longer than 50mm. Wider and longer pieces of tape may prevent proper installation.
Simulation of Nadir Holes

Nadir Holes: Different lens and camera combinations produce different sizes of nadir holes. The decision to use either 3, 4, 6, or 8 shot systems depends on the compromise between the size of nadir holes, speed, and resolution. Combinations that require 3 to 4 shots produce the smallest holes in triangular or square shapes, and are the fastest systems to shoot. Those that require 6 to 8 shots have larger holes in a star shape because of the diagonal orientation of the camera needed to roll the widest corner to corner angle of view to be parallel to the axis of rotation, but they also produce higher resolution panoramas because the lens utilizes larger areas of the camera sensor. 4 shot system is an optimal compromise.
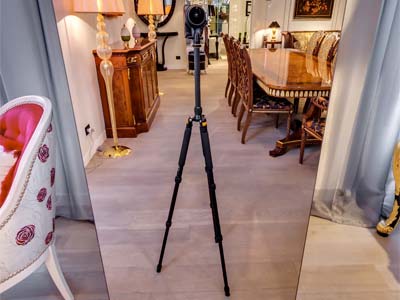
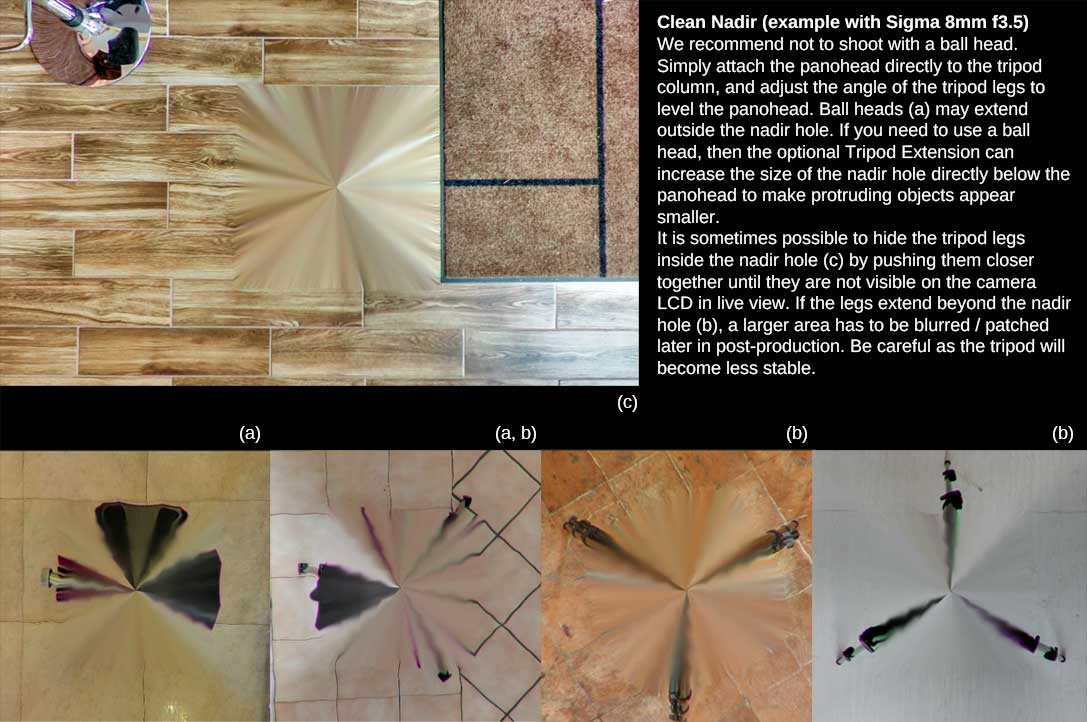
Hiding the Tripod Legs: It is sometimes possible to hide the tripod legs inside the nadir hole. Push the legs close enough together until you cannot see the legs in the image. This will reduce the stability of the tripod so please take care not to bump into the tripod and when in an area with a lot of people traffic. The Google Street View example demonstrates the setup in the reflection of the mirror.
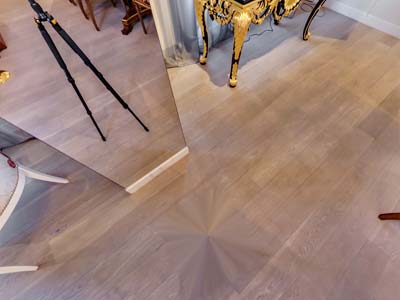
Minimize Protrusion into Nadir: I recommend not to use a ball head because large objects directly below the panohead will appear in the nadir. Simply attach the panohead directly to the tripod column, and use the tripod legs to level the panohead by pushing each leg closer or farther apart until it is level. The Google Street View example demonstrates the clean nadir. The blurring / patching of the nadir hole needs to be done in post-process. (Software is not included)
Tripod Extension (optional, not included): When shooting for Google Street View with the Sigma 8mm f3.5 lens, the nadir hole is about 62mm diameter at the bottom of the panohead. The typical Manfrotto tripod column is 59mm diameter. If your tripod column has a larger diameter, or if you need to use a ball head which has knobs and plates protruding out of the nadir hole, then the optional Tripod Extension accessory (not included) can be used to raise the lens by another 100mm, and increase the nadir hole to 100mm diameter at the bottom of the extension to make the objects that are directly below the panohead appear smaller and partially hide them inside the nadir hole. This will not reduce the size of the tripod legs because they are too far away from the lens to be affected by the increase in height.

Shooting Tips
Aperture: Fisheye lenses are usually more optimal at around f9 to f11 aperture with the best compromise between edge vs. center sharpness and depth of field. It is possible to go down to f8 when shooting in darker scenes for faster exposure, but the edges of the image start to become less sharp, which means the seams of the stitched panorama will be more soft. When shooting closer objects, you should make a test between f16 and f22 to see what setting gives you the best compromise between image sharpness and DOF. The Meike 6.5mm aperture scale seems to be lower than reality and should be set to around f16 to get an equivalent of f11.
Focus: At f9 to f11 for fisheye lenses, the images can usually be in focus from 1 meter to infinity for a very high depth of field. The focus needs to be adjusted first before inserting into the lens ring. To do this, set aperture to around f4, adjust the focus to an object 5 meters away, then set the aperture to f9 or f11, and then follow the instruction manual to insert the lens into the Tom Shot 360 lens ring. Some units of the Sigma 8mm f3.5 and Meike 6.5mm lenses have loose focus rings, which may cause the image to go in and out of focus when the front element is shaken or pressed, and affects image sharpness. The Tom Shot 360 lens ring can reduce this problem when the lens is properly installed into the ring, because the lens ring will grip and lock onto the focus ring and prevent it from moving. Because of this, all lenses with electronic focus must have the motor switched off to manual focus to prevent damage to the motor, since the focus may be locked by the lens ring. Lenses that have a protruding MF/AF switch (such as Sigma 8mm f3.5 EOS) need to be matched to a slot on the lens ring for installation (please see instruction manual). During installation for all lenses, you can watch the camera LCD in live view to double check that the focus is not accidentally changed while the lens ring screw is being tightened. If the lens ring allows free access to change the aperture (only available for some ring versions), you may keep the aperture at f4 during installation to help you check the focus, and afterward change to f9-f11. If the lens ring allows free access to change the focus ring (only available for some ring versions), then you can tighten the lens ring halfway, adjust the focus ring, then tighten the lens ring the rest of the way.
Rotator Lock: When shooting 360 videos, time lapse, long exposure, or tilted horizontally, unintended rotation can be prevented by using the rotator lock. The lock can be used in 2 different methods. 1) Physical: There are 8x locking holes at 45° spacing, that pass completely through the inner wall. This can be used to resist gravity when the panohead is tilted horizontally. It can only be used for 4 and 8 clicks, or at 0°, 45°, 90° and 180° intervals for the other clicks. 2) Friction Lock: For all other clicks and angles, the lock can be used with friction. It should only be used when the panohead is in vertical orientation. In both methods, the lock screw should always be disengaged before rotating the panohead. Do not rotate or apply external force to the panohead when the lock is engaged.
Mobility & Monopods: Shoot with a monopod for quick and easy panoramas, with a lens and camera combination requiring 3 to 4 shots. Single exposure is only possible, and usually this would be taken outdoor where the lighting is more flat. If it is dark, you can increase ISO, as long as you are able to shoot faster than 1/30 to 1/60 seconds to prevent motion blur. To keep the lens as close to the nodal point as possible, look at the built in bubble level, or use the Manfrotto Autopole Spirit Level which can be attached directly to the monopod (not included). A lens and camera combination requiring 6 to 8 shots is not practical with a monopod, but is possible.
HDR & Exposure Fusion: When shooting scenes with a wide dynamic range between shadows and highlights, multiple exposures can help create a more evenly exposed shot. This would require the use of a tripod, and it is recommended to use a shutter release or remote control to prevent shaking the camera during shooting. If your camera has Auto Exposure Bracketing (AEB), it is a helpful feature. Always shoot in full manual mode and manual white balance, and optionally shoot in RAW format for better image quality. Some camera bodies can process HDR and save as JPG internally, offering a quick and easy HDR, however the result per image may not be consistent, resulting in varying exposure across the panorama. I prefer to shoot AEB in RAW, process the RAW and export as TIFF in Lightroom for identical color balance, exposure, highlight, shadow, sharpening, noise reduction, CA removal, and Vignette (use only global modifiers, not local modifiers like Clarity), then bring into SNS-HDR for HDR merge, and finally into PTGui Pro for stitching. Alternatively, PTGui Pro has a built in HDR function if you want to skip SNS-HDR by importing the LR TIFF directly, or skip Lightroom by importing the JPG from the camera. (Software is not included)
Control Points & Lens Shift: During stitching in your software, the software optimizer should always be set to "Heavy Lens Shift." It is best to create a stitching template first, to be applied to your future panorama projects. A separate template needs to be created if you change the number of shots, for example between 3 and 4 shots, or if you change the camera sensor, size or orientation. It is best to create a template based on a set of photos from a scene with lots of unique textures. Rooms with tiles on the floor and ceiling work best. Completely white walls create problems for the automatic generation of control points. Furniture or picture frames on walls can help to break up the uniform surface. Control points should only be on fixed objects. Clouds, moving people, cars, and trees blowing in the wind can cause problems. If you have stitching problems, delete the control points from moving objects, and when shooting with large overlaps such as 6 and 8 shots, remember to check non-adjacent photos for control points, such as image 1 and 3, or 8 and 2. (Software is not included)
3D Printing Technology
The lens ring is printed with Selective Laser Sintering (SLS), which is a method of producing a physical duplicate of a 3D model by using a laser to fuse together 60 micron (average size) particles of powder, in typically 0.12mm layers. The material is a strong Polyamide 12 nylon (PA2200 Material Data Sheet). SLS printing produces the most functional printed parts because of its accuracy (0.2mm tolerance) and durability of the material, when compared to other types of printers such as FFF/FDM (less accurate, rougher surface) and SLA printers (very brittle).
When the SLS parts come out from the machine, the surface is white and like sandpaper. The parts are then smoothed in a tumbler with ceramic media for several hours, then colored in a vat of black dye and washed.
SLS 3D printing has a high unit cost, but in addition to the better part functionality, it can produce complex, large and thick uni-body shapes that cannot be made with other conventional technologies such as plastic injection molding. SLS technology also allows for quick production with low startup cost, and designs can be changed at no additional cost, which is better for more custom and small production runs. Whereas plastic injection molding has a low unit cost, but has a very high startup cost because the mold forms may cost several thousand dollars and cannot normally be changed, meaning that a change in design requires new mold forms to be produced, making it more suitable for mass production runs with no changes. Injection molding also has problems with thick and large parts.
Supported Lenses and Image Properties
| Lens Model | Mount Type | Ring Tilt | a. M4/3 Projection b. Orientation c. Shots (H + N) d. Size (Xs: yMP) e. Nadir Hole | a. APS-C Projection b. Orientation c. Shots (H + N) d. Size (Xs: yMP) e. Nadir Hole | a. FF Projection b. Orientation c. Shots (H + N) d. Size (Xs: yMP) e. Nadir Hole | (A) Aperture (F) Focus | Insert Direction |
|---|---|---|---|---|---|---|---|
| Sigma 8mm f3.5 | EOS, Nikon, Sigma | +7.5° | - | a. Part Circle b. 4 + 1 c. Portrait d. 16s: 46MP (1.5x) d. 18s: 57MP (1.6x) d. 24s: 69/76 (1.5/1.6) e. 12° / 8° (1.6/1.5) | a. Full Circle b. 3 (4) + 1 c. Portrait d. 24s: 29MP d. 36s: 44MP d. 51s: 61MP e. 8° | (A) Electronic (F) Fixed | Front of ring |
| Samyang 8mm f2.8 Series 2 | Sony E, Samsung NX, Fuji X, (EOS-M*) | +5° | - | a. Full Sensor b. 6 (8) + 1 c. Diagonal d. 16s: 64MP d. 24s: 96MP e. 22° / 16.5° (6/8) | a. Part Circle b. 3 (4) + 1 c. Portrait (shaved) d. 36s: 57MP d. 42s: 67MP e. ~10° | (A) Accessable (F) Accessable | Front of ring, remove rear lens cap |
| Samyang 7.5mm MFT, f3.5 | M4/3, Sony E | +4° | a. Full Sensor b. 6 (8) + 1 c. Diagonal d. 12s: 55MP d. 16s: 73MP d. 20s: 91MP e. 22-27° / 15-18° (6/8) | a. Part Circle b. 4 + 1 c. Portrait (shaved + adapter) d. 16s: 41MP d. 24s: 61MP e. 0° | a. Full Circle b. 3 (4) + 1 c. Portrait (shaved + adapter) d. 36s: 39MP d. 42s: 46MP e. 0° | (A) Accessable (F) Accessable | Front of ring, remove rear lens cap, remove adapters |
| Samyang 8mm f3.5 CSI & CSII for Canon | EOS, EOS-M, Sony Alpha & E, Samsung NX, M4/3, 4/3, Fuji X | +8° | - | a. Full Sensor b. 8 + 1 c. Diagonal d. 18s: 79MP (1.6x) d. 24s: 105MP (1.6x) e. 28° | a. Part Circle b. 3 (4) + 1 c. Portrait (Shaved or CSII) d. 24s: 38MP d. 36s: 57MP d. 51s: 79MP e. ~14° | (A) Fixed (F) Fixed | Front of ring |
| Samyang 8mm f3.5 CSI & CSII for Nikon | Nikon, Pentax | +5.5° | - | a. Full Sensor b. 6 (8) + 1 c. Diagonal d. 16s: 64MP (1.5x) d. 24s: 95MP (1.5x) e. 24°, 18° (6/8) | a. Part Circle b. 3 (4) + 1 c. Portrait (Shaved or CSII) d. 24s: 38MP d. 36s: 57MP e. ~11° | (A) Accessable (F) Fixed | Front of ring |
| Meike 6.5mm | EOS-M, Sony E, M4/3, Fuji X | +5° | a. Part Circle b. 4 + 1 c. Portrait d. - e. 0° | a. Full Circle b. 3 (4) + 1 c. Portrait d. - e. 0° | - | (A) Accessable (F) Fixed | Front of ring, Remove rear lens cap |
| Meike 8mm f3.5 Canon EOS | EOS | +3.5° | - | a. Full Sensor b. 6 + 1 c. Diagonal d. - e. 15° (8°@8x) | a. Part Circle b. 3 (4) + 1 c. Portrait d. - e. ~2° | (A) Accessable (F) Fixed | Front of ring |
| Meike 8mm f3.5 Nikon | Nikon, Sony E, Fuji X | +2° | - | a. Full Sensor b. 5 + 1 c. Diagonal d. - e. 0° | a. Part Circle b. 3 (4) + 1 c. Portrait d. - e. 0° | (A) Accessable (F) Fixed | Front of ring |
| Nikkor 10.5mm f2.8 | Nikon | +3.5° | - | a. Full Sensor b. 6 (8) + 1 c. Diagonal d. 16s: 90MP (1.5x) d. 24s: 134MP (1.5x e. 28°, 16.5° (6/8) | a. Part Circle b. 3 (4) + 1 c. Portrait (Shaved) d. 24s: 54MP d. 36s: 81MP e. ~6° | (A) Electronic (F) Accessable | Front of ring |
| Yasuhara Madoka 180, 7.3mm f4 | Sony E, Fuji X | +7° | - | a. Full Circle b. 3 (4) + 1 c. Portrait d. 16s: 18MP d. 24s: 27MP e. 10° | - | (A) Fixed (F) Fixed | Back of ring |
| Lensbaby Circular Fisheye, 5.8mm f3.5 (Classic Panohead Only) | EOS, EOS-M, Nikon, Sony Alpha & E, Samsung NX, M4/3, 4/3, Fuji X | +7.5° | a. Part Circle b. 4 + 1 c. Portrait d. 12s: 20MP d. 16s: 27MP d. 20s: 33MP e. 4° | a. Full Circle b. 3 (4) + 1 c. Portrait d. 18s: 20MP (1.6x) d. 24s: 27MP (1.6x) e. ° | - | (A) Accessable (F) Fixed | Front of ring |
| Sigma 4.5mm f2.8 (Classic Panohead Only) | EOS, Nikon, Sigma | +7.5° | - | a. Full Circle b. 3 (4) + 1 c. Portrait d. 18s: 20MP (1.6x) d. 24s: 27MP (1.6x) e. 10° | - | (A) Electronic (F) Accessable | Front of ring |

Summary (Total Time: 45 min; Cost: $25)
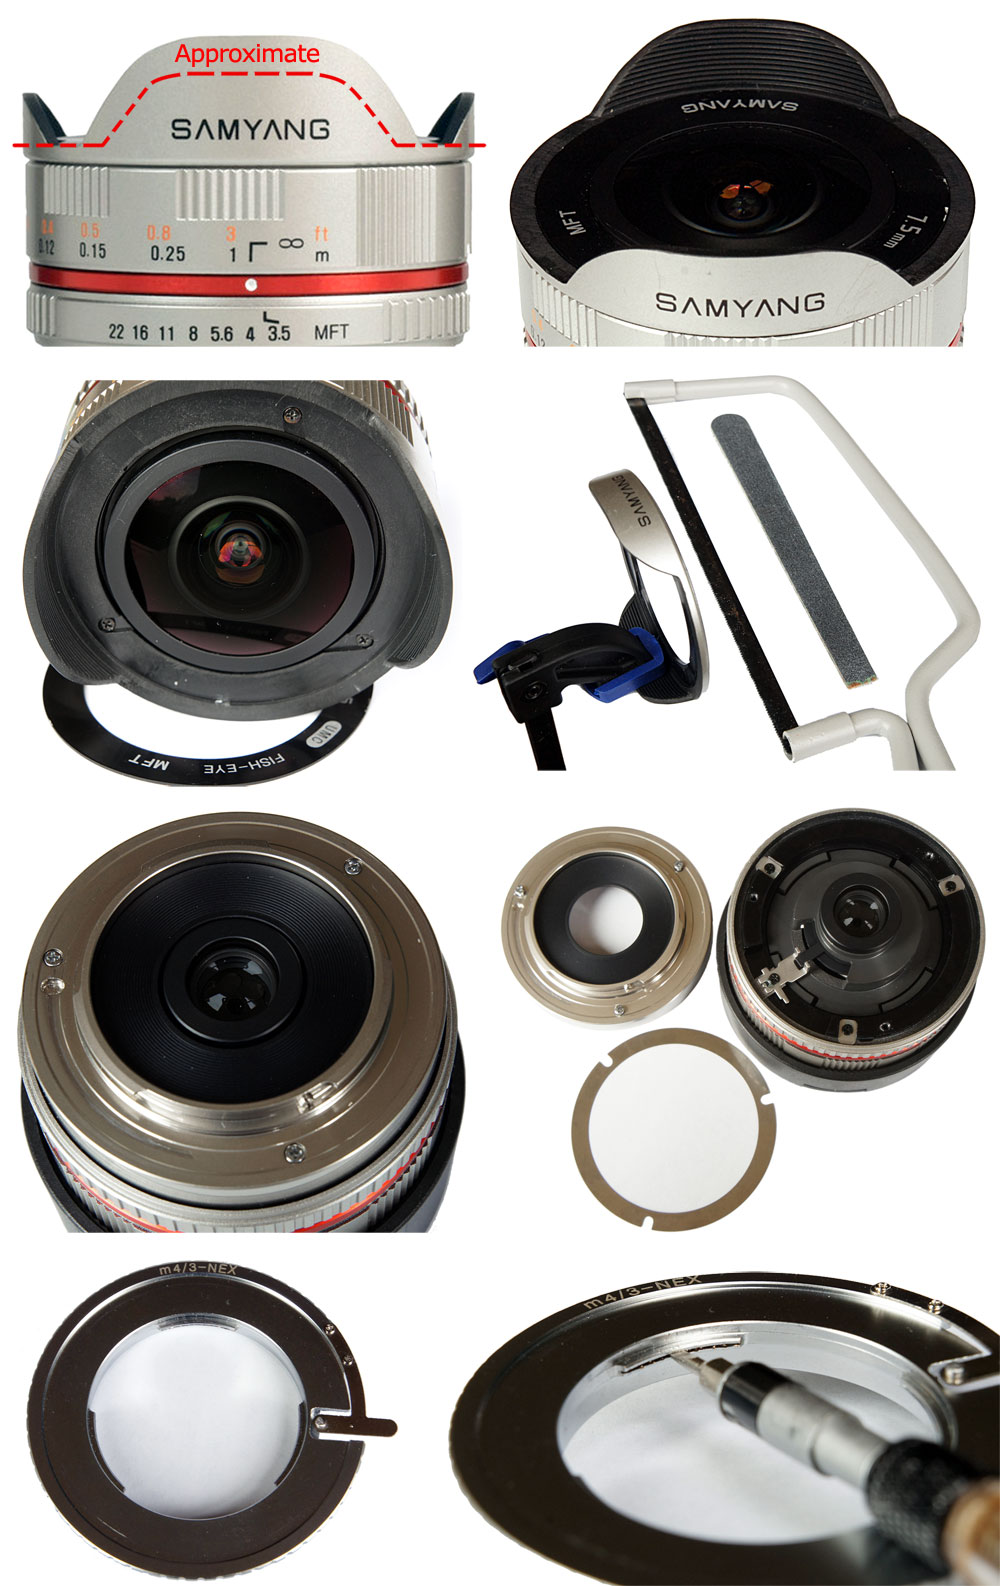
To use the Samyang 7.5mm MFT fisheye lens with a Sony E-mount camera you will need to shave the lens hood, remove shims, and attach a Micro 4/3 to Sony E-mount adapter. The modifications are very easy to make, and takes about 45 minutes to complete. It is done by you at your own risk.
Shave the Lens Hood (20 minutes)
Remove the black metallic label ring. The ring is backed with adhesive tape, pry gently. Then remove the three screws which are revealed, and the hood will come off. You need to completely remove the short shades of the lens hood, and shave about 3mm off the top and 1.5mm off the sides of the large shades. The large shades are needed to attach the lens cap. Draw a line along the intended cuts, clamp ($3) the hood to a table, and use a hack saw ($4) to cut a little bit less than intended. Use a nail file ($1) to remove the rest. Check intermittently with your camera to see if you have shaved enough of the hood so that you no longer see it in the image. Clean off the dust each time before reattaching.
Remove Shims (10 minutes)
The thickness of the Micro 4/3 to E-mount adapter could vary slightly than the needed 1.25mm thickness. If the adapter is thicker, then the lens is pushed forward slightly out of focus and you need to remove shims to bring it back. My adapter is 1.60mm thick, which is 0.45mm more than needed. Unscrew and detach the mounting plate on the back of the lens. Inside you will find multiple adjustment shims. My lens has 2 shims, 0.3mm and 0.05mm thick. You may find more in your lens. Remove one at a time until focus to infinity is achieved. Removing both shims was best for me. Focus to infinity (hyperfocal distance) may change and is usually achieved when the focus ring is set slightly below the infinity marking. In case you need to replace the screws attaching the lens mount, they are M1.6x9mm with a 2.5mm diameter flat head machine screws, which you can find on online micro fastener shops.
MFT to Sony E-mount Adapter (2 minutes)
You need an adapter to attach the MFT lens to the Sony E-mount. The adapters from eBay ($15) may be machined slightly wider than necessary and the lens sits a little loose inside the adapter. To make a tighter fit, insert the end of a screw driver into the slot inside the adapter mounting tabs to widen it. Do it slowly and in increments, checking intermittently if you are getting just enough tightness.
Shaving the Lens Cap (10 minutes)
You will also need to shave the lens cap, the same distance that you have shaved the hood.
Information
Customer Service
My Account
Copyright © 2021, Thomas, All Rights Reserved.